Sunday, May 30, 2010

Festive Banner


Currently I am obsessed with making banners. My talented friend made me a banner similar to this for St Patrick's day and I have been dying to make one ever since
Since tomorrow is Memorial Day, I thought is was appropriate to get it out the one I made for the Fourth, hang it up and make a post of it!

This was SO simple
trust me, you can make it

To make it the way I did 
All you need is

Coordinating Fabric
 Thread
Cut your fabric into triangles
Place triangles in your Bias Tape
Pin in place
Sew Across

*I used 8 triangles but you can use as many as you like. Big or small/ Long or Short

Have fun!!
(and expect some more of these from me in the near future!)
Happy Memorial Day!!

Wednesday, May 26, 2010

Update!

Ok so do you remember this post I did awhile back about Felt Baby Squares and how I said I really wanted to make one of my own?? 
Well I did it and made a Felt Square "book" for a friend of mine expecting a baby in a couple weeks.
Let me tell you this was a lot of fun and VERY simple.


All you need is 
black and white sheets of felt
 ( I used 4 white and 4 black with lots of spare scrapes left over- making a total of 8 pages)
coordinating thread
eyelets/eyelet tools (optional)
metal ring (optional)
I loved using the ring because it allows you to enjoy the squares together in a book or spread out on the floor!

Thanks to Crafting Chicks for the great idea

Getting Organized

Yesterday was not my favorite day. 
Things just kept going wrong ALL day. 
It definitely didn't get better when we ventured to the DMV at 5pm
 (Hate that place)
My poor husband has to go BACK- passport still in Utah! ugh

I realize that most of my stress yesterday was a result of being unorganized.
I consider myself an organized person in general..... but seriously there are some areas 
where I need to shape up!
I realized the best way to decrease my daily/weekly stressors...(meal planning/ cleaning/bills)
was to GET ORGANIZED

I have been following the blog Prepared Not Scared for awhile now and have loved it!
Many tips on getting organized with food storage and daily living along with recipes, activities etc. Awesome blog. Check it out.

Anyway today I was looking at their blog and found the solution to my organization woes
The Day Keeper

I am just blown away by how detailed and perfect this is. This woman has been working on the Day Keeper for years now.  It's perfect. More than perfect. Just what I need!!!

"The Day Keeper can be adapted to work 

for whatever season you're in, including Grandparenting!
Most of my planning is done on a weekly basis.
Even though each day of my week has a
different purpose and focus the daily format is consistent"


I am not even going to try and explain it, because she does a great job.
I will just direct you where to go- so you can check it out and 
GET ORGANIZED!! 
(oh and its all free too)


plus sections for

Birthday and Anniversary Cards
Birthday's and Anniversaries
Monthly Expenses Sheets
Bills to be Paid
Babysitter Information
"Here's What We Did This Month" Journal Pages
Running Project List
Important Names and Numbers
Our Family Goals
Visiting Teaching Information
Home Teaching Information
Wants, Needs, and Sizes
2010 Holidays
Weekly Shopping List
Breakfast Repeat
Monthly Emergency Preparedness Planning and Purchases
Authorization for Treatment of a Minor
Daily Quick Clean Schedule
Routines: Table of Contents
Pictures for Family History
My Routines
Kids Routines
Holiday Traditions and Ideas
Tabs
Routines Divider Page


Tomorrow she will talk about how to compile your binders!! I am excited!

Monday, May 24, 2010

Clark's Favorite Pork Chops

(image taken prior to cooking... fyi!)

Ok here's a super easy and tasty recipe for you to cook this week!!
It is again from my FAVORITE cookbook ever- 

Clark's Favorite Pork Chops

Arrange pork chops in a glass baking dish 
(we usually cook 3)
Top each pork chop with:
1 lemon slice
1 onion slice
2 tablespoons brown sugar
2 tablespoons ketchup

Cover and bake for 45 min at 350 degrees. Uncover and bake for 15 min more

Tastes great with some rice!!!

Perfect easy recipe for crazy days!!

Thursday, May 20, 2010

Line of Authority


Need a gift idea for you husband, father, brother etc... for Father's Day?? 

I posted this idea right when I started my blog when pretty much the only person reading it was my mom so I thought I'd post it again- this time with pictures! (I erased the earlier ones if you didn't notice)

For Christmas last year I gave my husband, dad, father in law and brothers a framed copy of their Priesthood Line of Authority. If you are not LDS, this may not make much sense to you but basically a document that shows who ordained an individual and who in turn ordained them and so on back to the Lord. Read more about it here. They all LOVED it, something so personal and unique. I became fascinated with them as I was putting them all together. Something very special for them to have record of!

If you are interested here is who you email: lineofauthority@ldschurch.org  -Send them your name/ persons name you are requesting and your address. If you are requesting your dads for example, they will have to mail it to his house- but they can address it to your mom or someone else in the home to keep it a secret!!

Once I got the document in the mail I re-typed it, printed it on card stock, threw a little ribbon (manly ribbon) on and placed it in a frame.

I think this with a tie would be a cute gift for Fathers Day!


Here is an example


Tuesday, May 18, 2010

10 Minute Beanbag!

{ took me a little longer but I am sure you sewing pro's out there could whip one out in ten!}

Sunday morning I needed a beanbag and I needed one quick. I am the music leader for the little kids at church and I had planned to use a beanbag as part of this weeks lesson- It totally slipped my mind that I actually needed to get a beanbag until hours before church. I had seen a couple ways to make your own beanbags before and I remember it looking pretty simple, so I went for it. 
For those of you wondering how to make some cute beanbags for your kids or whomever, here is how you do it {or at least how I did it!}
First gather supplies.... 
fabric/muslin, sewing supplies, beans (not pictured)
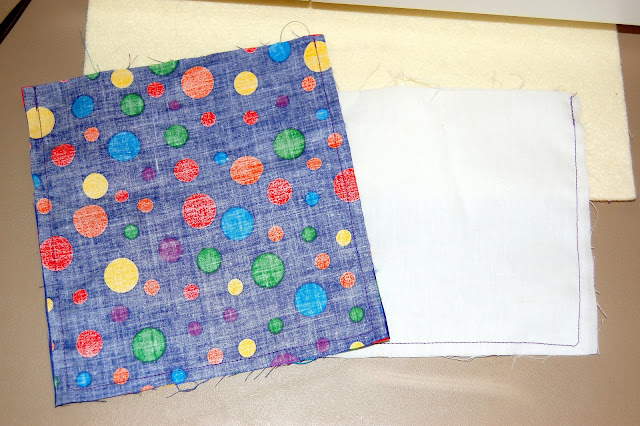
Next cut out your fabric- 7 X7 inches for the polka dot fabric and 6 X6 inches for the muslin
(wow could I take worse pictures or what! Can being in a hurry be a good excuse?!?)
 Now take your pieces and place them on top of each other (being sure to match them up)- right sides together and sew around the edge on three sides
Now take some scissors and clip the corners that you have sewn- this helps the fabric lay better in the corners
and then turn the right side out
Now take you beans (or if you are desperate like me making these last minute... corn etc..) and pour about 2 cups into your muslin pouch
Once filled, fold the top 1/2 inch of the opening into the bag and sew shut. If it doesn't look pretty, don't worry, no one will see it!
Now slip your little muslin pouch inside the larger pouch
And then just like the muslin- fold the top 1/2 inch into the bag and pin together (this one should look nice!)

Finally sew around all four corners about 1/4 inch from the edge and you're done!!!
thanks to Family Crafts for the help!!

now that I have my beanbag, I may be able to join in on a game of Corn hole- a beanbag toss game that apparently is super popular out here in the Midwest- my neighbors seem to like it and stay up playing it all night long OUTSIDE every weekend!  

Monday, May 17, 2010

Fabric Key Chain


I have been wanting to make a fabric key chain for a long time now!!
I have a big problem with loosing my keys... in my purse- (OK and everywhere else)
 I am ALWAYS looking for them!! 
I finally got around to making one last week and things are SO much better!! There is a great tutorial here-(The Idea ROOM via U create) It has great easy to follow steps!!
Here is how mine turned out!!!
Fits perfectly around the wrist- which helps while unloading groceries, or babies!!
I love it- Wouldn't this be a fun to give as a gift???


Chicken Curry Soup

This is such a great crock pot recipe!! We had this last night and boy was it tasty!! And really, can you go wrong with a crock pot recipe?? I think not! Nothing like coming home from church (at 430) and having your dinner already made... 
Chicken Curry Soup
(recipe and photo provided by Prudence Pennywise)
5 cups chicken broth
3/4 lb chicken, cut  into 1 inch pieces (or add it uncut and frozen-shred later)
1 large onion, diced
1 tart apple, peeled and diced
2 medium potatoes, peelied and chopped
2 carrots, peeled and chopped
1 Tablespoon curry powder
1/2 cup white or brown long grain rice

Optional 1/2 cup cream
For Serving: 
Fresh lime or lemon wedges
chopped cilantro
Place all in the Crockpot- Cook on hight for 3-4 hrs, or low for 6-8. Stir in cream if using at end!

For some reason, each time I cook this, I either forget or choose to leave out the cream- i'm sure it makes it taste wonderful- but without it, the soup is more stew- and still VERY tasty! I also thought about substituting the cream for coconut milk- might taste really good  in this- just an idea. I think I am going to try it next time!)

enjoy!!

Tuesday, May 11, 2010

Flower Cards

I made these little beauties for a card party a couple weeks ago. I got the template from my friend who had made them awhile back.  They were a lot of fun to make. 


I love how you can hide your message inside the flower.

move the center of the flower off to the side


Check out here for a pattern and other ideas!! And here is the outline of mine if you wanted to try copying it!
(sorry no scanner to upload my template!)

Have fun!!

Monday, May 10, 2010

Sausage Rice Casserole


This is one of my FAVORITE recipes (i say that a lot huh!) But really, this one is!! It is one that my mom got from my grandma- and trust me, anything she cooks is delicious! It reminds me of home every time I eat it. Enjoy!! Let me know what ya think!

Sausage Rice Casserole
Prep Time 20 min Cooking Time 1:15 Preheat 350
1 lb Sausage
1 onion chopped
1 cup celery chopped
1 pkg Lipton chicken noodle soup
4 cups of water or chicken broth
3/4 cups minute rice

Brown sausage and onion together, add celery
In 9X13 casserole dish add water soup and rice
Stir together
Add sausage mixture to dish and stir all together
Put in oven for around 1:15 (sometimes we only cook it for 45 min and it still tastes good) 
ENJOY!!

Wednesday, May 5, 2010

Birthday Wreath

Anyone have any birthdays coming up?? 
Well if you are like my family- EVERYONE's birthdays are in April and May.
I am a big fan of wreaths and just fell in LOVE with a new one found over at How Does She.
They have a great tutorial for making a beautiful colorful Birthday Wreath
This project is definitely going to be added to my "crafty" To Make List.
Such a great idea
Go check it out

Happy Cinco De Mayo

Here are a couple of my Favorite Mexican Recipes since I didn't post any on Monday! 

(one of our favorite recipes!!)
photo/recipe- Phemomenom

1/3 cup honey
1/4 cup lime juice(about 2 large limes 
2 teaspoons to 1 Tablespoon chili powder
2 large cloves of garlic, finely minced or 1/2 teaspoon garlic powder
1 lb boneless skinless chicken breasts (about 2 large breasts), cooked and shredded
12 corn tortillas
2 cups of Mexican cheese blend, shredded (1 small bag usually is 2 cups)
1 14-oz can of green enchilada sauce (mild or medium, to your taste)
1/2 to 3/4 cup of heavy cream
nonstick cooking spray
1 Tablespoon of chopped cilantro, to garnish

Preheat oven to 350 degrees F. Place the cooked and shredded chicken in a medium sized bowl. Set aside. In a small bowl, place the honey, lime juice, chili powder and minced garlic or garlic powder. Whisk together thoroughly to combine. Pour this mixture over the chicken and cover with plastic wrap. Allow to marinate while you prepare the tortillas, 30 minutes or up to 1 hour, in the refrigerator.

Heat a large griddle till a drop of water skitters across (about 350 degrees F). Spray the surface with non-stick cooking spray or a oil it with a little bit of canola oil in between each round of tortillas. Heat tortillas about 20 seconds on each side till warm and flexible and some golden brown spots have appeared. Remove the tortillas from the griddle and keep them between a couple of paper towels until ready to use.

Spray the sides and bottom of a 9x13-inch baking dish lightly with cooking spray.
In a medium bowl combine the enchilada sauce and the heavy cream. Spread about 1/2 cup of the mixture in the bottom of the oiled baking dish.
Add a large spoonful (about 2 tablespoons) of the chicken mixture to the center of each tortilla in a line. Cover the chicken with a large tablespoon (or big pinch) of cheese, then roll the tortilla up from one side to make a rolled enchilada - it will be more of an over lap on the seam side that rolled tightly. Place the enchilada seam side down in the baking dish starting at one end with the long edge parallel to the longest side of the pan so that you end up with two columns of six enchiladas each.
Repeat with the remaining chicken, cheese and tortillas. You will use about 1 1/2 cups of the cheese for the filling and set the remainder aside for topping the enchiladas in the pan. Add the remaining marinade mixture to the enchilada sauce and cream mixture, if desired. Pour this mixture over the top of all the enchiladas. Sprinkle with the remaining cheese.

Bake the enchiladas for 30 to 35 minutes, until the cheese is melted and bubbly and starting to brown on top. Serve with sour cream, black beans, and rice or a green salad for a great meal.

Serves 4 to 6

(MY husband served an LDS mission to Brazil and has made this a couple times- just like Tucanos, delicious!)
photo/recipe- our best bites

4 juicy limes (try and find ones with thin, smooth skins; they're the juiciest and the thin skin cuts down on the chance of your drink being bitter)
1 c. sugar
6 c. cold water
6 Tbsp. sweetened condensed milk


Mix cold water and sugar very well and chill until ready to use. This step can be done ahead of time.
Wash limes thoroughly with soap (I just use hand-dishwashing soap or regular hand soap); you need the soap to get the wax and pesticides off of the limes because you're using the WHOLE lime, baby. Cut the ends off the limes and then cut each lime into 8ths.

Place 1/2 of the limes in your blender.
Add 1/2 of the sugar water, place the lid on your blender, and pulse 5 times. Place a fine-mesh strainer over a pitcher (the one you'll serve the lemonade in) and pour the blended mixture through the strainer and into the pitcher. Use a spoon to press the rest of the liquid into the pitcher. Dump the pulp and stuff in the strainer into the trash. Repeat with remaining limes and sugar water. Add sweetened condensed milk; DO NOT leave this step out unless you will die of a horrible sweetened condensed milk allergy because this is the secret ingredient! You may want to taste test it at this point; I used giant, thick-skinned limes tonight and didn't test it and it came out a little bitter. If it's bitter, just add some more sugar and maybe a little more milk. 

Serve immediately over lots of ice. This does not keep well, so don't make this in advance (although you can cut the limes, mix the sugar water, and measure the sweetened condensed milk in advance). Serves 4, although I can pretty much guarantee you that people will want more; I usually plan on 1 1/2 servings at LEAST per person.


I am bringing this to a party tonight- posted awhile ago- but incase you forgot-it's our FAVORITE!


ENJOY!!
oh and Feliz Cumpleanos Alice!!