Showing posts with label crafts. Show all posts

Tuesday, June 7, 2011

Dry Erase Menu Board

I finally did a craft!! Yahoo, it's been awhile! Even better, I crafted with a friend which ALWAYS makes projects so much more fun. We saw this idea for a Dry Erase Menu Board via Pinterest/Make and Takes and knew we had to make one for ourselves!
This project was super fun and EASY! I have been dying to get myself organized when it comes to menu planning and I think this board is a step in the right direction. 
All you need is a frame {got mine at the $ store}
scrapbook paper
paint, ribbon, vinyl {optional}
If you don't want your days of the week vinyl, you can always hand write them.
For mine, I decided to glue some magnets on the back so it can go on my fridge! I love love love it!!!

Full tutorial here

Wednesday, November 17, 2010

Major Crush....

on this wreath!
Seen over at Oh Happy Day

Info on how to make it here at Pickles.
If I didn't have 100 things on my to do list, maybe I would attempt to make this... maybe. 
But for now, I will just have to enjoy looking at it

TuRkEy HeAdBaNd!!

My craft addiction started full force with this project last year


Like my son's skeleton costume, my inspiration came from Pottery Barn.
It was one of my first projects where I had no formal directions, just an idea to go off of.
Looking at it this year, I realize there are many things I could have done differently (like making the feathers a little bit smaller...) -
 but the fun is in learning right....
Overall, this was a fun project and taught me that homemade opposed to store bought can sometimes be more exciting!

Tuesday, August 31, 2010

S.L.A.C.K.E.R.

Yep, I have been a craft slacker....

#1 reason- August was not the nicest to us. After my two year old son broke his precious little arm, we all endured colds and later on the stomach flu.
#2 reason- My current "project" -
{baby #2 coming Feb 2011}
One I know will turn out just perfect
#3- Lazy and tired..... {see reason #2)

Luckily, I am getting my energy back and have even pulled my sewing machine out for a craft or two. Also, for some crazy reason, I decided to make a felt playhouse for my boy for Christmas. I am in the not so fun cutting stage but it is turning out pretty dang cute and excited to see how it turns out!!! (All I have to say is he better like it!) Pictures to come soon!

For now, here is a Table Runner Tutorial I found over at Diary of a Quilter
This is a project I have started on and have hopes to get done before fall is over. I have a feeling I will want to make one for each holiday!!
U create just posted many examples of those who followed this pattern!! So so cute!
Enjoy

Wednesday, August 11, 2010

Button Earrings

I have been meaning to make button earrings for a long time now and finally got around to making them today!
This was the easiest and greatest project ever.... and took me under five minutes to do!
 I'm sure most know how its done but will post directions just in case. 

First- buy some buttons that you think would look fab. as earrings
(as you can see, I kinda was having a thing for roses when I went button shopping)

Buy these

Heat up your glue gun

If your buttons have something on the back, snip it off with a good pair of scissors or have your man and his heavy duty equipment get it off for you!

Once off, you are all set. Just glue the backing to the button and you have yourself a cute new pair of earrings!!


Such a GREAT easy gift idea!!

So start looking through your old stash of buttons and make yourself some earrings!!

Thursday, July 29, 2010

Pillowcase Fun


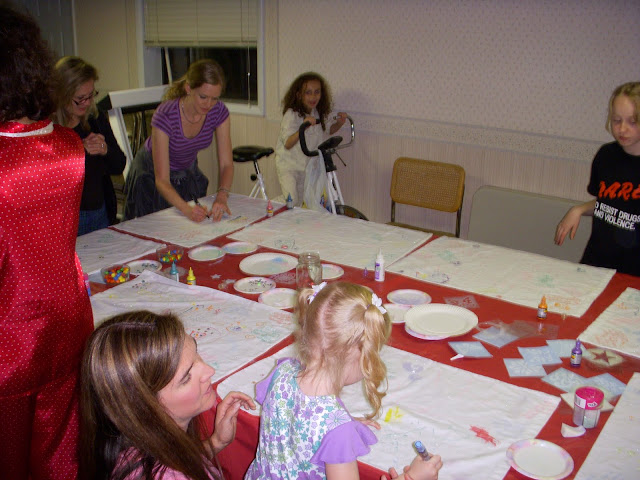
At one of my family reunions this past month, I was in charge of organizing a craft for 11 little kiddos. I instantly thought back to over a year ago, the night before my brothers wedding at a cousin pajama party. 

That night we each decorated our own pillowcases with paint, markers, jewels, glitter, etc.....  The possibilities are endless with what you can use. We then went around leaving messages for each other. Think of it as yearbook signing with pillowcases! It was SO much fun and seriously all ages were easily entertained!! It is such a great thing to have since most of us live far away from each other!! 

I knew this would be a great idea for my little nieces and son. The kids got so into it and even had all the aunts/ uncles and grandparents sign too. Instead of paint, however, we used fabric markers to decrease the mess. Such a fun, simple idea that kept all of us entertained!!

Wednesday, June 30, 2010

Fabric Flower Necklace

Ok I have been dying to make one of these for a long time now and finally got around to it!!
I was so excited to show my husband and see what he thought when I was finished!! 
Well when I showed it to him, he told me
it reminded him of a medal... and not a "necklace" he is used to!
(in the nicest way possible)
Awesome

Well medal or no medal, here is my "necklace" or bib as many call them
made especially for some upcoming family reunion pictures!


I got some inspiration and instructions here

try one, I dare you... you will get addicted!!!

Can't wait to make some more!!

Tuesday, June 8, 2010

Gone Fishin


This project was so much fun. Even my husband was excited about this one. 

My friend and I had previously been talking about how we wanted to make a little fishing set
and were so excited when we came across this great idea and tutorial.

We got together and went to work
(I must say doing crafts with friends is so much better than doing them by yourself) 

end result:

my son LOVES these
He asks to fish all the time
and believe me
 this makes for a happy fisherman husband

Tuesday, June 1, 2010

Fabric Panel Car Mat

I had been staring and wondering what to do with this fabric for awhile
I decided, last week, that it needed to be a car mat.
 My friend's little boy turned one recently and thought it (with some play cars) would be a fun gift to give. 
The process was quite simple
 Placed panel on the top
Batting in the middle 
and a layer of corduroy on the bottom
Stitched and bound together!
I was happy with how it turned out!!
Now I need to get the motivation to make my son one
He was pretty sad when we gave it away!!

Tuesday, May 18, 2010

10 Minute Beanbag!

{ took me a little longer but I am sure you sewing pro's out there could whip one out in ten!}

Sunday morning I needed a beanbag and I needed one quick. I am the music leader for the little kids at church and I had planned to use a beanbag as part of this weeks lesson- It totally slipped my mind that I actually needed to get a beanbag until hours before church. I had seen a couple ways to make your own beanbags before and I remember it looking pretty simple, so I went for it. 
For those of you wondering how to make some cute beanbags for your kids or whomever, here is how you do it {or at least how I did it!}
First gather supplies.... 
fabric/muslin, sewing supplies, beans (not pictured)
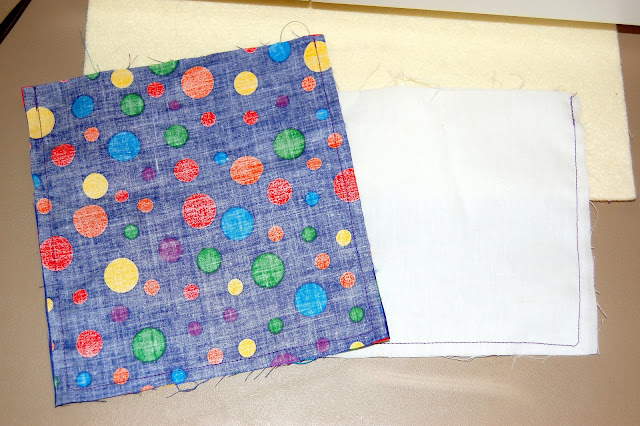
Next cut out your fabric- 7 X7 inches for the polka dot fabric and 6 X6 inches for the muslin
(wow could I take worse pictures or what! Can being in a hurry be a good excuse?!?)
 Now take your pieces and place them on top of each other (being sure to match them up)- right sides together and sew around the edge on three sides
Now take some scissors and clip the corners that you have sewn- this helps the fabric lay better in the corners
and then turn the right side out
Now take you beans (or if you are desperate like me making these last minute... corn etc..) and pour about 2 cups into your muslin pouch
Once filled, fold the top 1/2 inch of the opening into the bag and sew shut. If it doesn't look pretty, don't worry, no one will see it!
Now slip your little muslin pouch inside the larger pouch
And then just like the muslin- fold the top 1/2 inch into the bag and pin together (this one should look nice!)

Finally sew around all four corners about 1/4 inch from the edge and you're done!!!
thanks to Family Crafts for the help!!

now that I have my beanbag, I may be able to join in on a game of Corn hole- a beanbag toss game that apparently is super popular out here in the Midwest- my neighbors seem to like it and stay up playing it all night long OUTSIDE every weekend!  

Monday, May 17, 2010

Fabric Key Chain


I have been wanting to make a fabric key chain for a long time now!!
I have a big problem with loosing my keys... in my purse- (OK and everywhere else)
 I am ALWAYS looking for them!! 
I finally got around to making one last week and things are SO much better!! There is a great tutorial here-(The Idea ROOM via U create) It has great easy to follow steps!!
Here is how mine turned out!!!
Fits perfectly around the wrist- which helps while unloading groceries, or babies!!
I love it- Wouldn't this be a fun to give as a gift???


Tuesday, April 13, 2010

It's Birthday Time

This week my son turns TWO!!! Can't believe it. Some fun birthday/party projects coming your way!!


Thursday, April 8, 2010

Sneak Peak....

at my project for my son's birthday present.

 I told myself I would never make anything like this again... mostly because it took so much time, but I guess I forgot. This project has gone a lot smoother and faster though and I'm really excited for it!!!
Stay tuned!!

Monday, March 15, 2010

$3 Wreath

I have been wanting to make a wreath for Easter for awhile and while browsing through the dollar store last week I came upon a material I have never used before...
MOSS
I have always been a fan of all the moss wreaths, topiaries etc from Pottery Barn and have wanted to try to create one myself
so I decided to give it a try
The best thing about this wreath, is it cost me $3
$1 styrofoam wreath
2 bags {$1 each} of moss
{I didn't even use all the moss}
Now dollar store moss isn't the greenest moss I have ever seen, but it works... at least I am pretending it does
So all you do is get your styrofoam wreath
and place it over a towel or table {just not the carpet}

{if your wreath is not green like my classy high valued one, it may be wise to spray pain green, so the white doesn't show}

Get your hot glue gun and moss & go to town!!

I tried to cover every inch, even on the back
Sometimes I had to do a layer of glue on top of the moss to cover up the spots

Then take some Spray Adhesive {heavy duty hair spray}
and spray the wreath down.

Now attach a bow, little eggs, flower, ribbion hanging from top etc... and your done!!
There are so many ways to decorate this wreath... so let me know how you do it if you make one!!