Showing posts with label Valentines Day. Show all posts

Wednesday, February 15, 2012

Monster Valentine's Box

I know it's the day after Valentine's Day and I'm pretty sure the only one who reads this blog is my mom but I wanted to keep record of the fun Valentine's box I made with my son. 
After a quick and unsuccessful search on the Internet {I find it a bit sad this comes before my own brainstorming most of the time!!} I came up with this little guy on my own {gasp}.

One cereal box + wrapping paper + cardstock + pipecleaner +  Silhouette {of course optional}
 = a cute V day monster

Just number 1,345 why I love my Silhouette Cameo!

Sunday, February 14, 2010

Valentines Chair Backer

I have had my eye on these for awhile now 


Yes, they are from Pottery Barn

I really wanted to try making my own this year and found a great tutorial here -but realized it would take a lot more time than I had.
Anyway, I was really excited when I saw this website with great step by step instructions. Did a little at work and finished it up at home in no time-(Note: The tutorial says that you need 3 pieces of stiff felt- but I only had to use two- I think it is an error. Also they used glue alone to hold theirs together, where I along with the glue added a quick backstich to mine- just to hold it together extra tight!)
Here is how it turned out!!

Just love that is hangs on the back of the chair.
Was just perfect for holding little gifts in

REALLY this was such an EASY quick project!!

Hope you all had a great Valentines Day!!!

Friday, February 12, 2010

Valentines Day Gifts

Here is a glimpse at what I am giving my "VALENTINES" this coming Sunday.

So I was being serious when I said I was going to make these two projects. I decided to give them both to my husband.
First is my little "Coupon Book of Love"- idea from here
Let me tell you how easy it was using cards instead of having to cut out cardstock, such a great idea
I had a lot of fun with this and think the husband will like it
SO fun and So easy!! I included a coupon for a 10 massage from me (more than 10 min would just do me in, my poor husband :)  )
We joke at how bad I am at giving them so that's why I included a REAL coupon (gift certificate) for him to get a REAL massage- he will discover that on one of the cards.

The next is what I like to call a "Poor Man's Valentine Card" basically because it's used with 
Paper Bags (seen here)
This was SO much fun to make

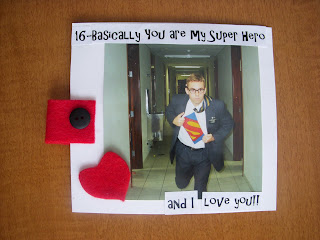
There are about 8 diferent cards he can pull out with a Reason why I love him/ picture attatched on each side
Here are a few examples

(inside joke)

(click to enlarge, one of my favorite pics of my hubbie)
Such fun and inexpensive gifts (well minus the massage gift cert.)

Oh and here are a couple more felt food desserts I am giving my son to add to his "fatty" and "sugary"
felt food collection!

I really need to make him some veggies!


Thursday, February 4, 2010

Inspired by Sour Cream...

When I went home for Christmas, my mother in law had such a fun craft for us to do. She told me that these cute little things were inspired by the little holders the sour cream at Wendys came in. Anyone know what I am talking about???
Anyway, it's the perfect little holder for treats, love notes, money, letters, um sour cream I guess...etc... We made a lot of these and gave them away at Christmas time, but perfect for V-day, your kids, teachers, classmates, Vteachers , neighbors....
Here is how you make them
The Supplies

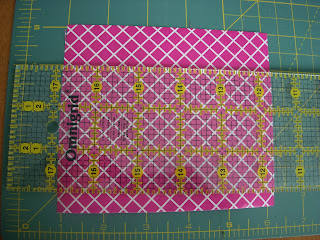
First take a sheet of paper, cardstock or wrapping paper- try not to get too heavy of paper

For the typical smaller size ones we cut the paper 4 1/2 by 5in. We did make one 6-7 in and turned out cute as well.

After cutting take one of the smaller ends and stick a piece of double sided tape on it. Join the two smaller end sides together and stick together in the middle, making a tube.

Then take one end, stick another piece of double sided tape inside on the edge and press it down

Next take your crimper (boy was it great to find a reason to use this after my scrapbooking days) and crimp the end you just taped.

The crimping showes up better on this paper

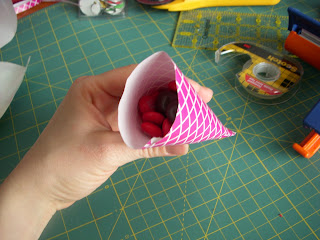
Next fill with candy or whatever you want

Now do the same thing to the other side but fold it the opposite way the previous one went, and crimp

Now you're almost done, take your hole puncher and punch a hole at the top.

This part is up to you, I like to put a ribbon through and attach some sort of tag so you can address who it goes to. Again, you can be creative at this part!!


Fun Huh!!
Well that's it- the sour cream holder- pretty easy- funny what things can inspire us huh!!

Tuesday, February 2, 2010

Felt V-day Treats!!

I have been meaning to make some felt food for my son ever since he got a play kitchen for Christmas. I have come to the conclusion that it is going to be over a period of time before we can stock his fridge and cupboards. For Valentines day, I thought it would be perfect to give him some dessert themed felt food items to get his collection going!! I started out with some doughnuts. I think I was craving them ever since I posted this.... Anyway, here is how they turned out....

for those of you whose hearts fancy chocolate glazed...


or maybe white frosting and chocolate sprinkles

After showing my husband these- he told me they looked great but didn't have enough sprinkles on them to tempt him... so here is his

just a few more!!

They were SO much fun to make and decided that each of you should know how to make them too- so here is how I did it (there are probably better and less complicated ways to do this but this is what I came up with)
Supplies: Felt (multiple colors) thread and needle (coordinating colors) scissors, stuffing
1- Cut out two circles that will make up the actual doughnut- I chose my chocolate brown for this one

(I know fabulous photography.. blame it on the camera!!)
2-Line the two up on top of each other and cut a hole in the middle-
3-Get another piece of felt that you want to use for the frosting and cut
4-Place frosting on top of circle, lining up where you want to place it, measure where the hole is and cut the exact shape of hole onto the frosting
5-Sew around the edge of the frosting in thread color of your choice (I liked mine matching) I used a backstich. Sew only on one of the circles!!
6-Add sprinkles. Easy- just do one little stitch randomly over the frosted area of the doughnut

7-Next, get your other circle and match all the holes together. Then do a little whip action (whip stich) around the middle circle with same thread.


8-Once your middle is sewn together, change thread and whip stich around the outside. I like to do almost half the circle before I added stuffing. Once halfway, stuff that baby, stitch some more, then stuff stuff stuff until you are done!!!


Not too bad right???

I couldn't just stop at the doughnuts.... so I made some festive sugar cookies
(click to enlarge)
DO these make anyone else hungry???
Anyway, thought these would be a fun Valentine gift, and the possiblities are endless!!!
Like I said before, felt food is quite addicting!! Dont be surprised if the next couple of posts are more felt food projects- Maybe I will try going a little healthier

Monday, January 25, 2010

Felt Heart Garland


If you have some leftover felt and about thirty minutes.... This is the project for you!! After making my Felt Heart Wreath I saw this wonderful idea over at Made by Rae. I knew I had to do it and was amazed by how easy it was!!.
So all you do it cut out your hearts (any size or color will do) and sew them together. For my mantle, a little over 50 hearts were perfect!!


Had to put the two projcets together

Just a little something festive to spruce up your mantle!!

Thursday, January 21, 2010

Felt Heart Wreath


I saw this super cute, easy felt wreath on The Idea Room and decided I had to make it for Valentines Day.  I also thought it would be a fun project to work on with some friends. I got a group together today and here are the results!! (click to enlarge) Since we did this in the afternoon, we had to bring the kids along which is partly the reason why most of our wreaths didn't get all the way finished!


We each did our own thing- mostly because styrofoam heart wreaths are SO hard to find. I got mine at Hobby Lobby but they apparently ran out. Joann's and Michaels don't carry them in the store but I know you can order them online!
Erika used styrofoam balls for hers and turned out super cute!!

Christine and her white wreath

Carrie and Ashley with their heart wreaths, each using different shades of red


Here is mine- yep pretty much copied the original, I'm kinda in love though!


So all you need is some sort of styrofoam wreath, ball etc... straight pins, about 3/4 yard of felt and scissors. I used a cup to make a 3 inch circle template and cut MANY circles out using my felt. Then you basically fold the circle twice and stick a pin through the bottom of the point into the wreath. Repeat X 200 or so until your wreth is covered!! There are so many ways you can go with this project and already want to make one for each holiday. How cute would 4th of July styro. balls be??
Such a fun craft, glad people come up with this stuff- maybe I should change the name of my blog to "The Idea Stealer!!" I"m so good at it!