Showing posts with label birthday. Show all posts

Tuesday, February 21, 2012

A Very Hungry Caterpillar Party


For my boy's FIRST BIRTHDAY, I decided to throw him a Very Hungry Caterpillar Birthday Party. This was such a fun theme to work with and are TONS of ideas online. I thought I'd add to the collection and maybe one day help someone plan their own Very Hungry Caterpillar party.
First off, the invites. I saw the idea here, at Pottery Barn and couldn't do anything else!
For the party, I served foods mentioned in the book and printed off labels found here
The balloons added a nice touch and were super easy.
I also had hanging a little month to month banner- this was very simple to make thanks to my Silhouette.
We read the book, colored and made fingerprint caterpillars
The cake/cupcakes were simple. I gave the red head to my son to smash!
A big thanks to my friend for reserving her clubhouse for us to use! 
 Such a fun party to plan. We had a great time celebrating my sweet BIG boy!

Tuesday, May 17, 2011

Sprinkle Birthday Shirt

Wow, it's been awhile!! Even my husband noticed that I hadn't blogged on here for awhile... now that's sayin' something!! The babe is 3 months and I am finally feeling somewhat in control of things again... somewhat!

Anyway, when I saw the Sprinkle Shirt on the MADE blog, I knew it was perfect for my sons birthday shirt. Even though the number 3 wasn't the most even and easiest to embroider around, I like how it turned out!!!
It was such a fun project to work on and very easy!!!

Monday, April 4, 2011

Birthday Countdown!

My son's birthday is fast approaching and since he LOVES advent calenders (just like his mama)- I thought it would be fun to make one and help build the anticipation to his big day! 
I got most of my inspiration from Nap Time Journal's Cupcake countdown.... when I saw it, I knew I had to make one for myself.  
I have a lot of felt leftover from my felt playhouse so this project cost me nothin'.
I am planning on having him take away one candle a day (which are velcroed to the cupcake)- Doing this will leave us with the BIG orange one { permanently sewn on} to mark his big day! 
{I made a total of 9 removable candles so if we use all of them, the countdown is ten days prior to birthday, ten makes things a bit crowded.. but more fun- right!}
The candles are made with two pieces of felt and some yellow ribbon 
{notes: The backing and orange hook are both made out of two pieces of felt sewn together.}
This was such a fun and surprisingly quick project.
Let the countdown begin... I know one little guy who is pretty excited!!

Tuesday, May 11, 2010

Flower Cards

I made these little beauties for a card party a couple weeks ago. I got the template from my friend who had made them awhile back.  They were a lot of fun to make. 


I love how you can hide your message inside the flower.

move the center of the flower off to the side


Check out here for a pattern and other ideas!! And here is the outline of mine if you wanted to try copying it!
(sorry no scanner to upload my template!)

Have fun!!

Wednesday, May 5, 2010

Birthday Wreath

Anyone have any birthdays coming up?? 
Well if you are like my family- EVERYONE's birthdays are in April and May.
I am a big fan of wreaths and just fell in LOVE with a new one found over at How Does She.
They have a great tutorial for making a beautiful colorful Birthday Wreath
This project is definitely going to be added to my "crafty" To Make List.
Such a great idea
Go check it out

Monday, April 19, 2010

Go Diego Go Party!!


This past week was my little boy's birthday!! He is totally in a Diego Stage and since our family is far far away, I thought it was appropriate to invite some of his little friends and throw him a Diego party. It was a lot of fun. I found many cute "jungle/diego" themed birthday party ideas at various sites online but one site was my favorite!!!
If your child is wanting a Nickelodeon themed party, this is the place to go
They have recipes, party games and activities, invitations, iron on printables, decor and much more!!! It was a great resource and helped alleviate much of the stress that accompaines planning a party.
I really loved the recipes I found and used these two for our fiesta!
Here is how my cake turned out!!
My cupcakes were not as awesome but they served their purpose!! Forgot to take a pic, but trust me the example is MUCH cuter!!
I also tried to tie in our food with the whole jungle theme!! So for our little lunch we served
dried ants- dried cranberries
bettle wings- chips
crocodile teeth- apple slices
jungle juice- juice boxes
snake skin- fruit roll-ups
Quesadillas
I also made some fun headbands for our guests to wear. These were SO easy to make and a lot of fun. At Hobby Lobby (and I am sure many other places) I found some jungle print felt and knew I had to use it for the party. All I did was cut 1.5 x 12 inch strips of the printed felt and sew it onto a 2 X 31 ish inch piece of solid print felt. The kids loved them. My favorite was the giraffe- how cute to put this onto some pink fabric... (too bad no pink was allowed at my boys party!!)
Here are the three types I made
We also hit a pinata, decorated paper bag diego vests and colored!! Such a fun morning!!

A Birthday Fit for a King

I have been dying to make one of these felt party crowns for along time now. There are seriously so many tutorials and examples of these all over the internet- I found a great video tutorial here that helped get me started. She has templates you can print off for two different crowns too!!
I printed off the template that looked more "boyish" and altered it a bit to make it bigger.
I also attatched some velcro so I could change the crown up over the years (or until it doesn't fit my son's head anymore!
So here are the steps that I did.....
to make this
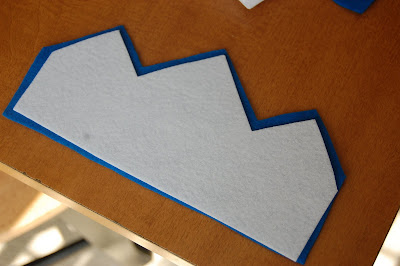
Using your pattern- cut out two crowns out of any color of felt. These pieces are the front and the back of the crown
Then take your top piece and add your embellishments to it. (ribbon, buttons, jewels, etc...) I sewed on a strip of ribbon and then a piece of velcro in the center.
Once you are done adding your embellishments, you can then place a single sheet of interfacing in between the two- This stiffens your crown so it wont be so floppy.
Make sure your cut it down a bit smaller than the felt so it doesn't show.
Now take some elastic and tuck one end between the back piece of felt and the interfacing. With that tacked in place, measure your kiddos head with the elastic. Once you have your measurement bring it in a little and pin the other side in place. (making the elastic smaller than your child's head will keep the crown on their head)
Now pin and sew together!!
That's it!! Super easy and quick. My son loved his- Such a fun way to make your child's birthday EXTRA special!!
f.y.i. - If for some reason a half a bottle of bubbles spills onto your newly made crown- don't fret- it does dry and you can't even tell in the pictures :) just saying!

(p.s.- I would love to post some patterns/templates on here but just don't know the best way to do it.. any tips?? I guess a scanner would be necessary but really I'm clueless!!! Thanks)

Tuesday, April 13, 2010

It's Birthday Time

This week my son turns TWO!!! Can't believe it. Some fun birthday/party projects coming your way!!