Showing posts with label tutorials. Show all posts

Tuesday, August 31, 2010

S.L.A.C.K.E.R.

Yep, I have been a craft slacker....

#1 reason- August was not the nicest to us. After my two year old son broke his precious little arm, we all endured colds and later on the stomach flu.
#2 reason- My current "project" -
{baby #2 coming Feb 2011}
One I know will turn out just perfect
#3- Lazy and tired..... {see reason #2)

Luckily, I am getting my energy back and have even pulled my sewing machine out for a craft or two. Also, for some crazy reason, I decided to make a felt playhouse for my boy for Christmas. I am in the not so fun cutting stage but it is turning out pretty dang cute and excited to see how it turns out!!! (All I have to say is he better like it!) Pictures to come soon!

For now, here is a Table Runner Tutorial I found over at Diary of a Quilter
This is a project I have started on and have hopes to get done before fall is over. I have a feeling I will want to make one for each holiday!!
U create just posted many examples of those who followed this pattern!! So so cute!
Enjoy

Tuesday, May 18, 2010

10 Minute Beanbag!

{ took me a little longer but I am sure you sewing pro's out there could whip one out in ten!}

Sunday morning I needed a beanbag and I needed one quick. I am the music leader for the little kids at church and I had planned to use a beanbag as part of this weeks lesson- It totally slipped my mind that I actually needed to get a beanbag until hours before church. I had seen a couple ways to make your own beanbags before and I remember it looking pretty simple, so I went for it. 
For those of you wondering how to make some cute beanbags for your kids or whomever, here is how you do it {or at least how I did it!}
First gather supplies.... 
fabric/muslin, sewing supplies, beans (not pictured)
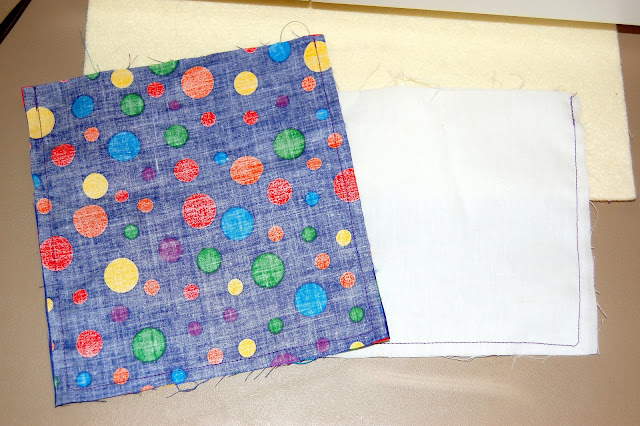
Next cut out your fabric- 7 X7 inches for the polka dot fabric and 6 X6 inches for the muslin
(wow could I take worse pictures or what! Can being in a hurry be a good excuse?!?)
 Now take your pieces and place them on top of each other (being sure to match them up)- right sides together and sew around the edge on three sides
Now take some scissors and clip the corners that you have sewn- this helps the fabric lay better in the corners
and then turn the right side out
Now take you beans (or if you are desperate like me making these last minute... corn etc..) and pour about 2 cups into your muslin pouch
Once filled, fold the top 1/2 inch of the opening into the bag and sew shut. If it doesn't look pretty, don't worry, no one will see it!
Now slip your little muslin pouch inside the larger pouch
And then just like the muslin- fold the top 1/2 inch into the bag and pin together (this one should look nice!)

Finally sew around all four corners about 1/4 inch from the edge and you're done!!!
thanks to Family Crafts for the help!!

now that I have my beanbag, I may be able to join in on a game of Corn hole- a beanbag toss game that apparently is super popular out here in the Midwest- my neighbors seem to like it and stay up playing it all night long OUTSIDE every weekend!