Tuesday, January 26, 2010

Brown Bear Brown Bear What Do You See.....

I see FINGER PUPPETS.... that's what I see

OK so this is my son's ALL TIME FAVORITE book, we read it at least twice a day, maybe more. I love it though, always have!
On a side note, due to the awful weather, we have spent a lot of our time in the library. What I love about our library is that you can check out everything.. books of course, along with stuffed animals, puzzles, toys etc. I began to notice that with a lot of their popular children's books, they had some sort of stuffed animal/object etc that would go along with the book. I thought it was a great idea especially when I saw how much my son loved holding a corudoy bear while we read the book "Corduroy"
Anyway, it gave me this idea....
I decided to make some finger puppets that my son could play with while reading our favorite book.
I made a couple finger puppets with my quiet book thanks to my college buddy Jill and basically used the same dimensions for these ones. I tried my best to match colors, shapes, etc as the book did and seriously was sad when I finished, they were a lot of fun to make!!
Here they are
something for all ten fingers...
well eleven if you count the one I made to represent my son!!
(and yes those are manly hands modeling, my son was not cooperating!!)
I thought this was an even better way of helping my child learn his animals and colors.
SO how I did it??
Well of course they are made out of felt, my favorite!! Used a simple blanket stich on the edges and glued the heck out of the googley eyes- After I was finished putting the two buttons on the boy and teacher, I realized it was a stupid idea since there are for my little boy to play with, so I am going to take them off soon,( just thought they were cute for the pic)


There you have it. This was such a FUN project- my boy loves them!!

Monday, January 25, 2010

Felt Heart Garland


If you have some leftover felt and about thirty minutes.... This is the project for you!! After making my Felt Heart Wreath I saw this wonderful idea over at Made by Rae. I knew I had to do it and was amazed by how easy it was!!.
So all you do it cut out your hearts (any size or color will do) and sew them together. For my mantle, a little over 50 hearts were perfect!!


Had to put the two projcets together

Just a little something festive to spruce up your mantle!!

Sunday, January 24, 2010

I "heart" Doughnuts


In case you haven't heard, from now until February 14th- When you buy a dozen doughnuts at participating Krispy Kreme stores, you get 12 Valentine Cards free.... Wait what is so cool about valentine cards??? Well in each card there is a coupon for a free doughnut!! So the question is, will you be giving away your cards or keeping them for yourself.... I am not going to answer that!!

Thursday, January 21, 2010

Felt Heart Wreath


I saw this super cute, easy felt wreath on The Idea Room and decided I had to make it for Valentines Day.  I also thought it would be a fun project to work on with some friends. I got a group together today and here are the results!! (click to enlarge) Since we did this in the afternoon, we had to bring the kids along which is partly the reason why most of our wreaths didn't get all the way finished!


We each did our own thing- mostly because styrofoam heart wreaths are SO hard to find. I got mine at Hobby Lobby but they apparently ran out. Joann's and Michaels don't carry them in the store but I know you can order them online!
Erika used styrofoam balls for hers and turned out super cute!!

Christine and her white wreath

Carrie and Ashley with their heart wreaths, each using different shades of red


Here is mine- yep pretty much copied the original, I'm kinda in love though!


So all you need is some sort of styrofoam wreath, ball etc... straight pins, about 3/4 yard of felt and scissors. I used a cup to make a 3 inch circle template and cut MANY circles out using my felt. Then you basically fold the circle twice and stick a pin through the bottom of the point into the wreath. Repeat X 200 or so until your wreth is covered!! There are so many ways you can go with this project and already want to make one for each holiday. How cute would 4th of July styro. balls be??
Such a fun craft, glad people come up with this stuff- maybe I should change the name of my blog to "The Idea Stealer!!" I"m so good at it!

Monday, January 18, 2010

Ragu & Prego no more!!


I have always loved a good Homemade Spaghetti Sauce recipe however, when it comes to cooking, I am one who likes to get things done quick and easy. Prego or Ragu have always been my top choices but found awhile back that they just weren't cutting it for us anymore. Spaghetti, once an all time favorite of mine was becoming just a boring meal to make when nothing else was planned and was not getting my "husband's having seconds or thirds" approval. Over the Christmas break, my mother in law cooked us spaghetti and really- we couldn't stop raving about it!! I told her we need the spaghetti sauce recipe and was happy to share. So if any of you are like me and getting sick of the premade spaghetti sauce, I have a great EASY recipe for you!!!
Brown 1 lb ground beef- Drain
Add
2 15 oz (or 1 29 oz) cans tomato sauce
1/4 cup dried onions (love these)
3/4 tsp oregano
3/4 tsp. basil
1/4 tsp marjoram
1/2 cup Water
1 tsp sugar
1/2 tsp salt
1/2 tsp pepper
Bring to a boil and cook for 10 min or until desired temperature
That's it!! Super easy and delicious.

Friday, January 15, 2010

Fabric Heart Wreath

Here is a little Valentines Day Wreath I made last year with my mother in law and wanted to post it again on this blog because it was just SO fun and easy. I found the idea on Little Birdie Secrets.

Here are your supplies


[I got my foam heart online at Joannes-) They are surprisingly hard to come by these days

Take about 3/4 of a yard of fabric and cut into 2 inch squares. These can be all the same fabric or a combination of different fabrics

Fill a paper bowl with glue. Place fabric square on pencil tip with right-side facing the pencil (a pen or stylus would work as well). Be sure the pencil tip is in the center. Dip the fabric covered pencil tip into the glue. You don’t need a lot, just a little on the end.

Press the pencil tip into the Styrofoam hard enough that when you remove the pencil--your fabric stays in place. Continue doing until your whole wreath is covered


Add a ribbon and hang up. They recommended tying a small loop around the finished wreath with string, then threaded the ribbon through that.


Well there you have it, pretty easy huh!! Took a couple hours- a super easy craft to do to get you ready for Lovers Day!!!
another cute heart wreath coming soon!!!

Tuesday, January 12, 2010

Christmas Tree Advent Calendar!

OK first off- SORRY this is a Christmas Craft post- I am way over Christmas and sure you are too, but I just had to post this for my own record and of course to give ideas for any future craft you are going to do.
I saw this a couple months ago and meant to make it before the month of December (with it being an advent calendar and all).Well when I didn't get it done before December 1st- I had high hopes to complete it before Christmas day, wrong again. I finished it this past week on a boring snowy day! Good thing I am so slow this year with putting away my Christmas Decor- I can now pack it away with the rest of the Christmas stuff!
Anyway, Advent Calendars are my FAVORITE and was so excited when I saw the idea here. I pretty much copied everything so you can see how to make it and store it in your brain for 11 months! I am planning on filling it with an activty to do each day. Okay, here is how it turned out and again, sorry for the Post Christmas Christmas Post!! I promise to post some fun V day Ideas soon!!


Back view

Cute little guy huh

Monday, January 11, 2010

3D Snowflakes

I learned how to make 3D Snowflakes at work awhile back and have made them every year since. They are so fun/easy to make and are pretty cool to look at. You could go so many ways with this project (size, color, texture, etc....)  Here are the basics....
First gather these materials


Then take 6 pieces of paper (the size of the paper determining the size of your snowflake) Fold each of the 6 pieces of paper in half diagonally and if it doesn't make a perfect triangle, cut off the edge that sticks out (rectangular edge) and make it straight.
Next cut three lines on each side of the triangle from the folded edge, making sure not to cut through the other side. The cut lines should be parallel on each side, leaving just a small space between them. You could always fold the triangle in half to make it easier and a little bit more even if the type of paper your using allows it.


Next unfold your triangle to make a diamond and roll the first two innermost paper lines together to form a tube. Tape the pieces together. You should see triangle shapes on each side of the roll.


Flip your diamond over. Take the next two paper lines and pull them together on the opposite side of the tube and tape together as before.


Keep doing this, alternating sides each time until all paper lines have been joined.


Repeat until you have 6 of these. Staple them together in threes


Then staple your two pieces together in the center
along with the 6 edges where each piece meets
And Voila!!

Such a fun project to do with the kiddos
Happy Winter

Thursday, January 7, 2010

Homemade Christmas 2009 Results

Husband is in Medical school + $900 plane tickets home = Homemade Presents for the family.....they felt really lucky I am sure!!

Despite taking a bit more time getting my Christmas list completed, I really enjoyed making my gifts this year. It is always such a fun experience to watch someone open a gift that you made -just for them (however hoping that they dont look too close to the seams...) In the end, we saved a lot. I probably used like 50 Joannes and Micheals coupons through the process!! Well here are the results. Sorry I posted them after Christmas BUT they had to be a surprise!!
Aprons-
These couldn't get any easier. You take a tea/linen towel and sew two straight lines arcoss the top. Tie one end of the strings and pull the other to add the ruffle. Then take a ribbon and place it on the inside of the ruffle to stabilize it. (This part will feel quite bumpy while you sew and it freaked me out at first, but somehow it turns out ok)
Then sew a ribbon on both ends at the top for the strap around the neck and then one at each side and your done!!
I liked adding buttons to the front as well. I would loved to have added a pocket on the front but ran out of time.  EASY huh!!! I got this pack of linen towels at Target for $10. 3 aprons for $10- I'll take it!!
2-Modge-Podge Stars-

You know the metal stars that EVERYONE has. Well I decided to take a little modge podge and try doing something different with them. I took various pattered cardstock, traced an outline of each triangle and stuck it on the star- Are you noticing a trend here- EASY- even easier than the aprons. Then to add a little somethin I wrapped a ribbon around it and it was ready to go. I did an everyday one and 2 holiday ones. I want to do a 4th of July one sometime!!

3-The Men's Gift-

Dad, father in Law, brother, husband- These guys always give me grief when their birthday or a holiday rolls around. Always so hard to shop for. Well this year I thought of a great, personal gift I could give them all. If you are not LDS, this document probably wont make too much sense but what I did was I got a copy of their Priesthood line of Authority, re-typed it, printed it on cardstock, threw a little ribbon on and placed it in a frame. They really loved it and half of them had never seen theirs. IF you are interested here is the email- lineofauthority@ldschurch.org . Send them your name/ persons name you are requesting and your address. IF you are requesting like your dads for example, they will have to mail it to his house- but they can address it to your mom to keep it a secret!! I think this with a tie would be a cute gift for Fathers Day!!


4-Crocheted Scarf-
All I did was the basic stitch cause that's all I know how to do! I am determined to get better.

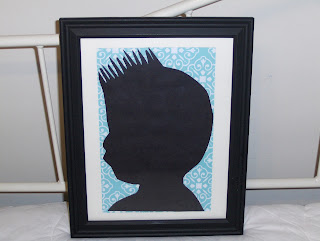
5-Silhouette Pictures
These have been floating around the blog world forever and finally decided to try them out. (Sorry mom and Alice, these were my first!) I just took a profile picture of my little guy, copied it, traced/cut onto Black paper. Take any cardstock to put in the background and put in a frame!

Wednesday, January 6, 2010

Curling Eyelashes

Before I get around to posting some homemade gift ideas, I wanted to share a beauty tip I learned last summer from my beautiful sister in law!! SO simple and works like a charm
So first you take one of these


plus


blow hot air on the curler for 30 sec or so
Then wave it a couple times to cool it down (you dont want it too hot!)
Then curl


Result: Super curled eyelashes that stay curled the WHOLE day!!
Thanks Tay for helping me look more awake!!

Monday, January 4, 2010

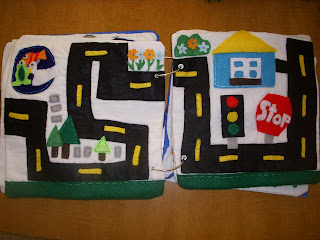
Quiet Book

For those of you who read my other blog, you may be familiar with the BIG project I have been working on- Blake's quiet book! Well I finished it just in time for Christmas and ready to show you the end results. This was such a fun project, however very time consuming!! I am so glad I did it though and plan on doing some extra pages that I can add on down the road!!
Here it is (I posted the new pages at the beginning)


Camping Page

Can't go camping without having some SMores!!

These two are one of my favorites and by far took the longest to make!!

Animals are velcroed on

stop sign and light are too

My lovely assistant will show you where the car goes


The fridge page


stocked with food

the plate ready to be filled

Utensils, S&P are velcroed

Mailbox page (Thanks again Jill)


Make a Face

Count the Apples- Apples are Velcroed on

Lace the football

Place to store pics


Gumballs velcroed on

Fish held on by magnets

Match the shapes

My IOWA pages
Thread the corn- Yellow beads will be included to thread when my boy gets a little older

Barn page (Jill)

By far, Blake's favorite page


I have had a couple people ask if I have a template available. The answer is no, not yet anyway. I will try and put one together so if you would like one, let me know!!
(Of course the farm and mailbox page wouldn't be included- you can get the template for those at Homemadebyjill)